If you’re a Synology NAS user who has mistakenly deleted crucial files, you’re not alone. The good news is that it’s often possible to recover data from a NAS hard drive with the right methods and tools. In this guide, we’ll delve into the world of NAS data recovery and walk you through the step-by-step process of restoring deleted files from your Synology NAS hard drive. Let’s get started on the journey and bid farewell to worries about how to recover deleted files on Synology NAS.
Part 1: How to Recover Deleted Files from Synology NAS
The most straightforward solution to recover deleted files on a Synology NAS is to use the built-in Recycle Bin. However, if the files in the Recycle Bin have been emptied or permanently deleted for other reasons, you can also use reliable NAS recovery software or backups to recover files from Synology NAS.
Solution 1: Recover Deleted Files from NAS drive from Recycle Bin
To prevent data loss, Synology offers the Recycle Bin option, allowing you to recover data from a NAS hard drive. However, you need to enable this feature for a shared folder before using it. Follow these steps to activate the Recycle Bin feature:
Step 1: Launch DiskStation Manager. Then, navigate to “Control Panel” and locate the “Shared Folder” option.
Step 2: Choose a shared folder and click on the “Edit” button.
Step 3: Place a checkmark in the Enable Recycle Bin option. If you wish to limit access to the Recycle Bin to administrators exclusively, also mark the Restrict access to administrators only box.

Step 4: Save your changes by clicking the “OK” button.
Here is how to recover deleted files on Synology NAS from Recycle Bin:
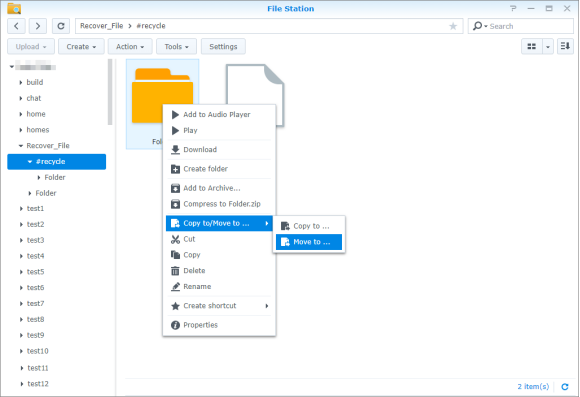
Step 1: Open File Station and navigate to the shared folder where the Recycle Bin is active.
Step 2: Access the “#recycle” subfolder.
Step 3: Perform a right-click on the file or folder you want to recover.
Step 4: Choose the “Copy to/Move to…” option and select “Move to…” to restore the deleted item to your preferred destination.

Solution 2: Recover Deleted Files from NAS Drive with Reliable Software (BEST)
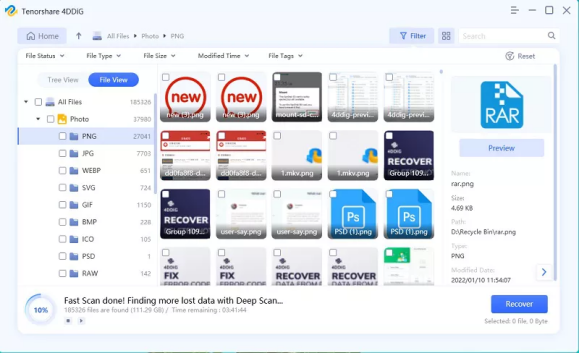
The best NAS data recovery software has to be Tenorshare 4DDiG. This software can not only recover deleted files from Synology NAS with a high success rate but is also suitable for other data loss scenarios, such as system crashes, virus attacks, formatting, and more. Let’s explore some key features of it:
- Tailored Data Recovery for NAS Servers.
- User-friendly interface and simple and easy-to-understand operation process.
- Free NAS data recovery software.
- Effortlessly Restore Over 2000 File Types, Such as Photos, Videos, Documents, and Audio.
- Retrieve Data from Laptops, PCs, Internal and External Drives, USB Flash Drives, SD Cards, and More.
Step 1: Install and launch Tenorshare 4DDiG. Then, choose ‘NAS’ and click ‘Connect to NAS’ to establish a connection with your NAS storage devices where you lost your data.

Step 2: Fill in the necessary information to connect to your NAS, including the IP Address, Port Number, ID, and Password. Once filled, click ‘Connect’ to establish the connection.

Step 3: Now, select the types of files you want to recover and click ‘Scan Selected File Types’. After choosing the location to save the recovered data, the entire data recovery process is complete.

Solution 3: Recover Deleted Files from NAS Drive Using Windows Built-in Tool
You can recover data from a NAS hard drive using the ‘Backup and Restore (Windows 7)’ feature in Windows. However, a prerequisite for this method is that you have previously used this tool to back up files to your Synology Drive. Here is how to do it:
Step 1: Connect your NAS hard drive to your PC. Then, press Windows + R keys and type “Control” or “Control Panel”. Hit the Enter Key.
Step 2: Navigate to “System and Security” > “Backup and Restore (Windows 7).” Then, click on the “Restore my files” button under the “Restore” section.

Step 3: Click on the option that says “Browse for files” if you want to select individual files, or “Browse for folders” if you want to restore an entire folder. Next, navigate to the location of your backup on the NAS hard drive.

Step 4: Select the files or folders you want to recover and click the “Add files” or “Add folders” button to add them to the restore list.
Step 5: After you’ve added the files or folders to the restore list, click the “Next” button. Finally, click the “Restore” button to start the restoration process.


Solution 4: Recover Deleted Files from NAS Drive By Professional Services
If all the above methods fail to recover deleted files on a Synology NAS, consider consulting a professional data recovery service. These experts have the necessary tools and expertise to recover data from NAS hard drives in more complex scenarios.
It’s important to note that professional data recovery services can be costly, making them less ideal for budget-conscious users. Furthermore, the data recovery process may extend over several days or even weeks.


Part 2: How to Prevent Data Loss on Synology NAS?
No one wants to spend a significant amount of time and effort to recover files from a NAS drive again. Therefore, it is crucial to take proactive measures to prevent data loss.
Regular Backups:
Regularly back up your data to an external drive or cloud storage like Google Drive. The 3-2-1 backup rule is a good guideline: have at least three total copies of your data, with two of them being on different media, and one of them located offsite.
Regular Software Updates:
Keep your Synology NAS operating system and applications up to date. Software updates often include security fixes and improvements that can help protect your data.
Enable the Recycle Bin feature:
While enabling the Recycle Bin feature may consume some extra disk space, it makes it easy for you to recover deleted files on a Synology NAS.
Install Nas Data Recovery Software:
Installing reliable NAS recovery software on your computer in advance is also a wise precaution, enabling you to act promptly upon data loss and improving the chances of successful data recovery.
Part 3: Recover Deleted Files from NAS Drive FAQs
Q1: What is NAS recovery?
NAS recovery refers to the process of restoring data from a Network-Attached Storage device (NAS) when files are accidentally deleted, corrupted, or otherwise lost. Data loss on a NAS can occur for various reasons, including accidental deletion, hardware failure, software issues, or even natural disasters.
Q2: Where do deleted files go in the NAS?
When you delete a file on a Network-Attached Storage (NAS) device, the file typically goes to a designated location called the “Recycle Bin” or “Trash” folder. The deleted files will remain in this folder until they are either manually permanently deleted or until the NAS system automatically empties the Recycle Bin to free up storage space.
Q3: How to recover deleted files from Synology NAS without Recycle Bin?
In general, there are three methods to recover deleted files from a Synology NAS when there is no recycle bin. Before attempting any recovery, refrain from writing new data to the NAS to prevent data overwriting.
Method 1: Use third-party NAS data recovery software.
Method 2: Contact Synology’s support or search for data recovery services.
Method 3: Restore deleted files from other backup sources.
Final Words
Now, you no longer need to worry about how to recover deleted files on Synology NAS. Whether you prefer free NAS data recovery software, built-in backup tools, or professional assistance, acting promptly is crucial for successful recovery. Additionally, taking preventive measures, such as regular backups, will help you confidently navigate the world of NAS data recovery and safeguard your valuable files.
Interesting Related Article: “How to Successfully Manage a Software Development Team“

![How to Recover Deleted Files on Synology NAS [2023 Updated] How to Recover Deleted Files on Synology NAS [2023 Updated]](https://marketbusinessnews.com/wp-content/uploads/2023/10/Intro.png)


